There are various techniques for painting with resin that allow you to create things unique in their beauty - decorative coasters and cup holders, plates and countertops, paintings, and interior items. The main ingredients for creativity are epoxy and hardener. They can be painted on a blank canvas or applied to ready-made substrates. Depending on this, the depth and unusualness of the pattern will vary. Below we will discuss the most popular and sapid fill techniques.
Petri dish
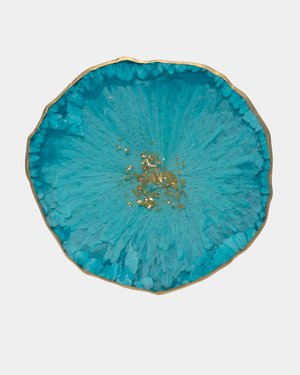 The new-fashioned and very sapid Petri Art technique, also known as Petri dish, allows you to recreate real micro-universes in Petri dishes using epoxy by simply adding multi-colored alcohol ink to them. The Petri dish is a transparent saucer with a lid. Such saucers can be found in laboratories and bought in specialized stores or a pharmacy. You can also use a specific reusable mold for making coasters, which too sold in stores. The work on this technique consists of several stages:
- The resin and hardener mix first. This stage is in every technique since it is from it that work with the solution begins. Mixing carries out according to the instructions until the desired viscosity reach.
- The solution is poured into a mold and quickly warmed up with a gas burner or a building hairdryer. It is significant not to overheat it as it can turn yellow.
- After 3-5 minutes, another layer of resin adds with the obligatory elimination of bubbles.
- After filling out the form and checking for the absence of bubbles, the most interesting begins - and colored alcohol ink adds to the fill. They are needed drop by drop to start the magic process.
After 10-15 minutes, you need to make ornate stains on the surface with a toothpick. White ink looks especially impressive: it is slightly heavier and sinks to the bottom of the form, painting in different colors of the rainbow. After 10 hours, you can enjoy the results of working with the Petri Art technique.
Resin Art
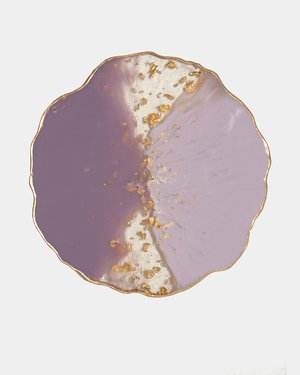 The "Rezin Art" technique is a godsend for those who cannot draw but want to try. It allows you to create on flat surfaces. The procedure involves mixing a two-component epoxy resin with a hardener with additional tinting using pastes and pigments. They are responsible for unusual color transitions, patterns, and vibrant hues.
When working in the Resin Art technique, epoxy applies to the workpiece in several layers, but you can create unusual patterns with strokes between them. As a result, we get the most live multi-dimensional drawing of "living" pictures.
Brains
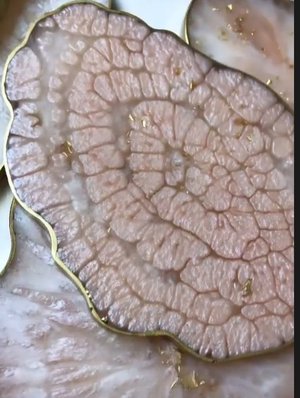 Epoxy painting techniques allow you to create the most unexpected effects, such as brains. The work begins with the preparation of the mortar. The resin is mixed with the hardener in the right proportions, taking into account the size of the mold. It is better to choose contrasting colors for such an effect - this way, it will be more noticeable and traced. In the simplest version, two colors are enough, and the bright one should apply as a base coat. The lighter shade distributes over the surface.
For a beautiful blending of shades, the surface inflates with a hairdryer. Too much color should not add, as there will be no effect - the colors will blur. Note that working with resin - this is a roulette: I want to make the effect of brains on the surface and get, for example, clouds. True, both options will be fine!
Stone cut (geode)
Another interesting resin painting technique is cutting a stone. It has a spherical or almond shape and is very similar to a live natural mineral. In this technique, it is advisable to work with the base using a transparent vinyl film fixed to a sheet of plywood. The required form of the mineral a drawn on it with a marker then the edges are outlined with silicone sealant or glue.
After drying, work begins with the inner space of the future stone cut. For this, an epoxy resin of the desired colors prepare. Adding pigments, powders, pigment pastes, glitter to the layers will make the section even more unique, textured, and effective.
Fill colors perform from the outside to the inside. From time to time, the surface should be inflated with a torch to eliminate bubbles. When all the colors fill in, you can give the effect of smoothness again with a hairdryer. The colors will begin to flow into each other. Due to which a realistic pattern with stains will create on the surface. After the blank is formed and filled, the center decorates with glass chips, multi-colored crystals, sparkles, or beads.
Cat's eye
This effect requires a pearlescent epoxy. It is obtained by mixing a pearlescent pigment with a transparent resin and the addition of blue, cyan, magenta, and sometimes droplets of black shades: the amount depends on the desired depth of the final color.
Mirror crumb of a small and large fraction place in the center of the mold. The gold powder is poured from a spatula, more into the middle giving the central part any shape. A little resin is poured on top to fix the decorative layer. A dark color pours along the edge of the workpiece, the rest of the base cover with a transparent resin. A prepared pearlescent color pours into the border between the flowers so that a transparent area with decor remains in the center. If smooth transitions are required, a burner or a building hairdryer use.
Using the cat's eye technique, complete the design with transfer foil. It easily applies with a spatula into a transparent primer. You can transfer the mirror leaf to the surface by lightly pressing your fingers on the colored side.
Ocean beach
The peculiarity of this resin pouring technique is the use of special additive Resi-WAVE. This white powder helps to achieve a 3D sea foam effect. You can also use a gritty textured paste. Details of the marine theme in the corals' form and seashells will add realism to the finished painting. To simulate the ocean, the technique of streaks and color gradients use.
Work begins with applying a paste with a sand effect, shells, Resi-WAVE additive to the workpiece. Then the mold is left to dry for 10 hours. If the textures have firmly adhered to the surface, it's time to apply the primer. Then is done with acrylic paint throughout the entire space without sand. Dry again for 12 hours. After that, the epoxy resin is poured directly into the ocean. The ocean effect provides by blue, turquoise, blue hues. You can add white, gold, or metallic colors to them. The prepared resin purs onto the surface. With a hairdryer, waves, streaks, color gradients create on it.
Galactic pattern
To paint a picture with the "Galactic Pattern" technique, you will need a spray gun - with its help, can be formed the effect of the starry sky. The same achieves with a short-bristled brush that splashes paint onto the surface. The epoxy resin is prepared according to the instructions and poured into cups according to the selected shades. The base is a transparent resin. The cosmic glow achieves by using white. In the future, the rest of the paints will apply to it - usually blue, violet, purple, dark green. With the help of a gas burner, the desired transition of shades and their combinations achieves. If the white appears slightly on the surface, you can take a tinted resin and pour it on top.
3D painting on resin
Epoxy is suitable for creating unique 3D masterpieces with a three-dimensional effect. For this, a solution is first prepared, again according to the instructions. The base will be transparent. The number of layers may differ depending on the depth of the finished product and the number of drawings planes. Surface painting begins only after drying the surface.
The prepared mixture is poured into a container and evenly distributed over it. It is significant that the surface is the same along the entire perimeter and must be free of bubbles and dust particles: they will be very noticeable on a transparent fill. 3D drawing - a rather laborious process. Since work with the next layer begins after the previous one has dried. Due to the arrangement of the pictures at different levels, a three-dimensional effect obtains.
Wood based
Epoxy resin is suitable for woodworking. On its basis, you can make, for example, an original table or cutting board. The wood must be well dried so that there is no deformation of the surface later. Sanding will make it smooth, which is significant for perfect superficies. A thin layer of resin before fully pouring should apply to the table surface so that it is absorbed into it and hides possible bubbles.
After the preparation layer has dried, the main volume of the solution purs. As the process progresses, pigments and glitter add to it. Refill is allowed if the layer seems too thin. The countertop can remove from the mold after 2-3 days from the moment of pouring.
Dirty glass
One of the simplest ways to draw is the Dirty Glass technique. The bottom line is that resin or acrylic fill is mixed inside the plastic cup with any amount of colored pigments addition. Then the resulting mass is poured onto the canvas in one motion. The resin should be allowed to spread by tilting the surface using spatulas or a hairdryer. The result is original abstract effects by mixing colors and creating bizarre shapes.
Zephyr
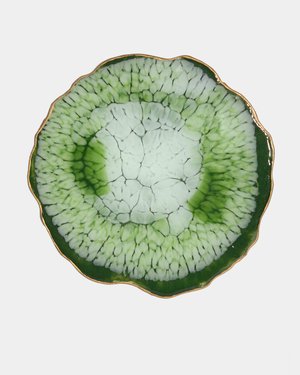 For the creation of a zephyr effect, the resin mix with a hardener. The solution div into three parts: the first is dark, for example, black with the addition of sparkles, the second is transparent, in the third adds sparkles and white dye. Everything mixes well. Fix black paint in the middle. Black paint remnants place on the edges of the mold frames. Transparent color with sparkles pours out on the black center. White paint applies on top of the base layer. With the help of a torch, bubbles remove from the surface. After which the workpiece sents to dry. After 12-16 hours, you will get a cup holder or plate made using the Zephyr technique.
Flowers
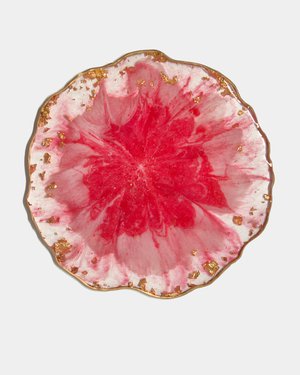 For work in the technique, the resin prepares in the desired colors for the center and petals. The poured center decorate with sparkles or glitter. The workpiece is left for 15 minutes for the layer to set slightly. Then the second selected color is applied on top: this can be done immediately in the form of a flower, which is then pulled out with a toothpick or a thin spatula to achieve the desired effect. The second large flower is applied in a contrasting color - already for the entire workpiece. Its petals gently pull out until a beautiful pattern obtains.
Haze
A very nice effect when painting with resin is a haze in the thickness of the transparent layer, which gives a stand or cheese plate a zest. As always, the work begins with the preparation by mixing the solution, taking into account the required proportions, which then divs into two parts - one is left transparent, and the other paints with the desired color. The transparent resin creates a bubble-free pouring inside the mold. Then a toothpick is taken and dipped in the painted composition. The tip goes down into a transparent layer they need to drive horizontally and vertically to paint the haze effect. If you want to add richness to it, you can additionally dip a toothpick directly into the paint.
A regular syringe will help make a haze, into which paint first draws, and then a needle is put on. Having lowered it into the fill, you need to slowly squeeze out the colored resin into the transparent fill, moving the needs in different directions to change the haze direction.
The variety of epoxy painting techniques shows how beautiful things create with your own hands, even in the absence of artistic skills and talent. And if you want to buy resin coasters , you can choose them on our website. These accessories are great gifts for all lovers of handmade and cozy decor.